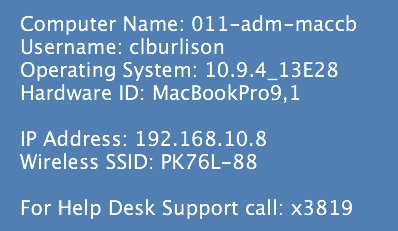
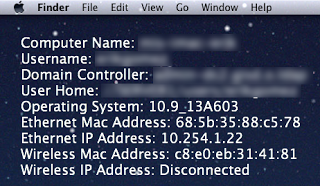
Display useful information on your Desktop using Geektool. Make troubleshooting network issues for your end users easier. Find your hostname faster. The amount of useful information is limitless. If you can script it…you can display it.

Introduction
Firstly, I take no credit for this valuable resource. All credit should go to Erik Gomez from the munki-dev mailing list. All I have done is modified the script to work in my environment. Modifications included removing some excess if/ then statements, remove the MAC address, adding current SSID, and a few other tweaks so the script played nicely as a profile. The writing is on the wall, mcx is slowing dying or at least it is becoming a less preferred method of managing preferences.

Requirements -You will want to download and save these somewhere.
What is it?
In short, this is simply a bash script that Geektool is running in the background. It defaults to refreshing every 30 seconds, though you can modify this in the org.tynsoe.geeklet.shell.plist file, which has negligible performance toll on Mac clients. You want the refresh rate low so when the network drops or you get a new IP address you can easily see changes.
The Script
How do you use it?
Great now what? Well that script does nothing for you. Unless you want to manually copy and paste on every computer…for every user profile…in your entire fleet. So lets automate that process a bit. If you have not done so already you will want to download all five (5) of the requirements above. This includes two command lines tools created by Tim Sutton, Geektool.app, the gist with all the necessary plist files, and a profile to launch Geektool at login.
Modify the script
Info
Note: If you wish to use the script as is, feel free to skip below to creating the profiles.
This will be the most time consuming process so start small. Lets start by changing the Help Desk Phone Number in my script. Open the main plist org.tynsoe.geeklet.shell.plist from the gist zip file. Scroll down to line 116 and change the following line to something useful.
#### Technology Support
echo "For Help Desk Support call: x3819"
Now is a good time to mention that the script inside of the plist has been modified from the original geektool_script.sh script. The plist file needs to have & encoded as &. For that reason if you make to many changes to the script you will need to test for compatibility with GeekTool. Testing will be outside the scope of this post but a hint if you are running into errors: open Geektool manually and paste your script directly into the application.
Creating the profiles
Note for this to work, I have found that having two profiles was the easiest solution but your milage may vary. The main reason for splitting the profiles into two, was to use one profile for launching Geektool at login and the second profile deals with organization settings for Geektool: refresh rate, script, color of the text, etc.
Part 1 - Login profile
With that out of the way, I will go ahead and say I cheated and created the Geektool-login-item.mobileconfig with my profile server since it was easier than creating from scratch. You should have downloaded the referenced profile under the requirement section. You can modify this profile to have your organization name by opening the file in a text editing application (aka not TextEdit.app). Search for “Birdville ISD” and change to your organization name. Save and exit.
Part 2 - Organization profile
Now we are going to use Tim Sutton’s mcxToProfile. This tool will combine the three plist files below:
org.tynsoe.geeklet.shell.plistorg.tynsoe.GeekTool.plistorg.tynsoe.geektool3.plistinto a single usable profile.
Put mcxToProfile.py in the same directory as your three plist files. After changing directory to the folder with your files run the following in Terminal:
Creating your profile
mcxToProfile.py -r org.tynsoe.geeklet.shell.plist org.tynsoe.GeekTool.plist \
org.tynsoe.geektool3.plist --identifier BISD-GeekTool --displayname=BISD-GeekTool --manage Often
Info
Note: You will want to change your identifier and displayname to something useful for your organization.
This will create a second profile with the name of your “identifier + .mobileconfig”
Deploying your Profiles
This is kind of the bonus round. If you have made it this far you should have two working profiles (one was already made for you). If you have a MDM server you could simply upload the profiles to that, you could have users double click the files, etc. I however choose to install the profiles via a package for my users.
Luckily, Tim has made our life easy once again. This time we will use make-profile-pkg to create a package containing our profiles. If you are using munki it is even easier, as this tool can even automatically import into your munki repository.
Making sure your .mobileconfig files and make-profile-pkg.py are in the same directory. Run the following to create your install package.
make_profile_pkg.py --munki-import Geektool-login-item.mobileconfig
In the following, you will need to modify the profile name with your correct file.
make_profile_pkg.py --munki-import identifier.mobileconfig
Info
Note: You will want to remove the –munki-import flag if you just want to create a package.
Ending Notes
Hopefully you find this as useful as I did. If you run into any issues feel free to contact me on Twitter or email.
Dependencies
- Geektool.app needs to be located in /Applications/.
- A logout/login is required after the profiles are installed for the information to be displayed.
- If one or both of your profiles are removed…bye bye Desktop Info.
- This script is only good for network interfaces up to 5. If you need more add them in the script.
- Tested with 10.7 Lion through 10.9 Mavericks with success.
- The text is white by default. If your desktop background is a bright color then you will want to change the text color using Geektool.
Credits
Again, a giant thank you to Erik Gomez for sharing with the munki community. Without his original documentation I would have never gotten this to work. Thanks to Tim Sutton for providing awesome tools.