Warning
Update: This article should only be used for reference at this time. Mandrill has been great for many years but no longer has an active maintainer. Please use MunkiWebAdmin 2 (mwa2) from github.com/munki/mwa2 instead.
Intro
This is Part 2 of a series on setting up a munki server on Ubuntu 14.04. Read Part 1 here. This section goes over setting up Mandrill so we can edit our repo metadata files, modify manifests, and assign new software to our fleet using a web browser.
A brief description of Mandrill.
Multi-user web front-end for managing a Munki repository. If you’re here because of MailChimp, my apologies but this isn’t the Mandrill you’re looking for. /wavehand
Mandrill is a NodeJS web application written using the Meteor framework. It supports one database engine: MongoDB. There are no plans to support other engines, but fear not, mandrillctl will install and secure MongoDB for you. If you already have MongoDB running on your server via homebrew, you should probably remove that installation first, or use an alternate server.
–Joe Wollard
The Install
Lucky for us Joe, the developer, has excellent documentation for installation on Ubuntu. Unfortunately, the documentation is for an older version of Ubuntu and some of the commands need modification to work with 14.04 and this series. Instead of redirecting you back and forth between his guide and this, I decided to include all the commands required below without the descriptions. For more information on what/why you are doing something please reference the wiki here.
Creating Users & Groups
Lets create the Mandrill user and munki group along with allow mandrill access to modify our munki repo.
sudo addgroup --system munki
sudo adduser --system _mandrill --ingroup munki --force-badname
sudo chown -R _mandrill:munki /usr/local/munki_repo/
sudo chmod -R 2774 /usr/local/munki_repo
Info
Note: You should receive an error from creating the ‘munki’ group if you went through Part 1. This is fine move along.
Install build tools
sudo apt-get install git curl build-essential
Install NodeJS
cd ~/
curl -O http://nodejs.org/dist/v0.10.26/node-v0.10.26-linux-x64.tar.gz
sudo tar --strip-components 1 -C /usr/local -zxf node-v0.10.26-linux-x64.tar.gz
rm node-v0.10.26-linux-x64.tar.gz
Install Nginx & pm2
sudo apt-get install nginx
sudo npm install pm2 -g --unsafe-perm # updated from wiki

# install startup scripts to make sure pm2 and all its daemons
# respawn when the server reboots.
sudo pm2 startup ubuntu
Configuring pm2
–direct from wiki start–
Be sure to change ROOT_URL and PORT to values appropriate for your environment! If you’re running a MongoDB instance on another server, or if your MongoDB instance requires authentication, you should change MONGO_URL as well.
One thing you should not change is instances as Mandrill is not currently aware of other instances of itself and will needlessly consume resources.
–end–
sudo nano /usr/local/etc/mandrilld.json
[{
    "name": "mandrilld",
    "script": "/usr/local/Mandrill/main.js",
    "env": {
        "ROOT_URL": "http://192.168.20.133:3001",
        "PORT": "3001",
        "MONGO_URL": "mongodb://localhost:27017/Mandrill",
        "MANDRILL_MODE": "production"
    },
    "instances": "1",
    "error_file": "/var/log/mandrill/mandrill-err.log",
    "out_file": "/var/log/mandrill/mandrill.log",
    "pid_file": "/var/run/mandrill.pid"
}]
The log directory must exist before you start mandrilld for the first time.
sudo mkdir /var/log/mandrill
Configuring Nginx
If you read my Part 1 guide before October 19th you will want to follow the new steps from Part 1 - Setting up Nginx. These changes were made in order to accommodate Munkireport, which we will setup next.
At this point, you have two options that you need to be aware of for using Mandrill:
- Use the default port 3001
- Setup a DNS A record for your server
You get these choices since we will be setting up Munkireport next. Since I am not in charge of the network at my workplace I will simply leave Nginx alone and connect via port 3001. If however you would like to access Mandrill via a sub domain name or alternate address you can follow the original setup steps below. Just make sure and change your server_name to a record that is not the current hostname of your server. This change is necessary since by default Mandrill needs redirects for both the root directory of your web-server and /mandrill to work.
Install Meteor
# First, install meteor
curl https://install.meteor.com | /bin/sh

# next, install meteorite
sudo npm install -g meteorite
Install MongoDB
sudo apt-key adv --keyserver hkp://keyserver.ubuntu.com:80 \
    --recv 7F0CEB10

echo 'deb http://downloads-distro.mongodb.org/repo/ubuntu-upstart dist 10gen' \
    | sudo tee /etc/apt/sources.list.d/mongodb.list

sudo apt-get update
sudo apt-get install mongodb-10gen
Installing Mandrill
git clone https://github.com/wollardj/Mandrill.git

# If you want the latest source code, you're done. However,
# I suggest sticking with the latest release...
cd Mandrill
git checkout tags/`git tag -l | tail -n 1`

sudo mrt bundle Mandrill.tar.gz # updated from wiki

sudo mkdir /usr/local/Mandrill
sudo tar --strip-components 1 -C /usr/local/Mandrill -zxf Mandrill.tar.gz
Now lets manually start our mandrill site.
sudo pm2 start /usr/local/etc/mandrilld.json
sudo service mongodb start
Visit to verify that everything is working http://munki:3001
Mandrill Settings
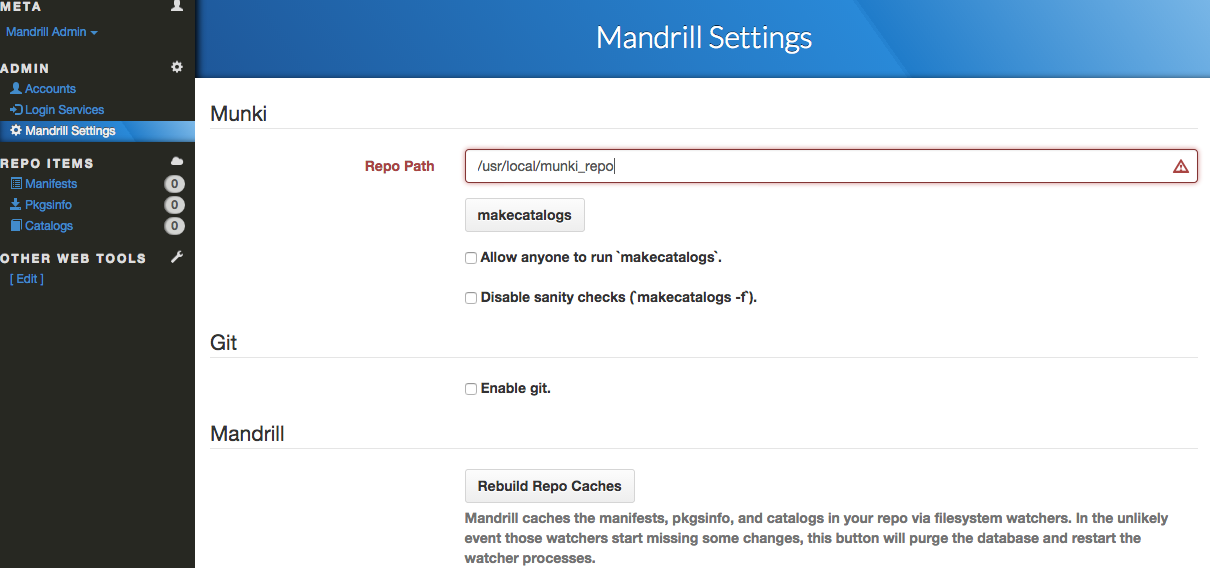
Log into the web portal with the default username admin and password admin. You will obviously want to change this password to something more secure. Under the mandrill settings tab you will want to change your repo path to /usr/local/munki_repo/.
Conclusion
Mandrill is setup! Stay tuned for Part 3, setting up Munkireport.
Articles:
Mandrill Wiki